One of the coolest features (I think) is the ability to quickly enter a bunch of items into a list using the voice recognition. I use this feature for making grocery lists every week. My spouse loves it. Not because she likes the app, but because she likes that I volunteer to do the grocery shopping so I can do some "real world" tests (if you call a trip to Kroger the real world). We keep a paper list on the fridge and when it's time to shop I pull it down and enter everything into aList using the voice recognition. For this example I wrote down a bunch of produce items on a piece of paper (cucumbers, lettuce, apples, grapes, onions, limes, sweet potatoes and oranges).
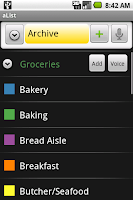

The first thing I did was import the grocery list that comes with the app. Even if you don't use many of the items in the list it has a bunch of obvious grocery store categories you can use to get started. The first screen shot is what the grocery list looks like after the import. All of the categories and items have been imported into the archive and the list is being displayed as categories.
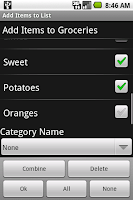
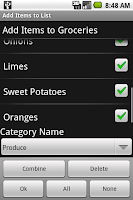
To add items, I tap the "Voice" button and start reading my list. When I'm quiet for a couple of seconds at the end, the voice recognizer kicks off a request to the cloud and after a tiny bit more aList shows the result of the voice recognition processing. This time the voice recognition worked perfectly. It's not that way every time. If you end up using the app, send me some of the funny voice recognition misunderstanding you get and I'll post them. When I process the list I get back from the voice recognizer, I present each individual word in the list. If you say "ice" "cream" those two words will be listed separately. I don't know if you want a bag of ice and a pint of cream or some Chunky Monkey. In this example, I said "sweet" "potatoes". So in order to add "sweet potatoes" to my list I need to check these two entires and tap the
Combine button.
If you get something weird from the voice recognizer and you don't want to correct it, just check the box and tap the
Delete button or leave it uncheck when you tap
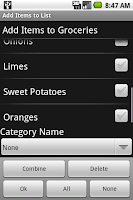
Ok. If you get something close, but not quite what you want, tap the entry and an edit interface will pop up. Finally, check all the items you want to add to your list (in this case they're all good to go so I tap the
All button) and click
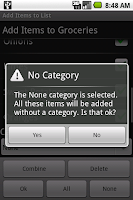
Ok. aList now asks me if I want to add this to the list without a category. I say no and go back and select Produce on the spinner.
After I tap
Ok, these items are added to the list. The process of adding them to the list checks the archive to see if they already exist. If they do, the items get moved from the archive to the active list if they don't they get added to the database to be used by the list. Switching over to the Lists I'm currently using (by tapping the yellow Archive on the control bar) I see my items in my list. Actually, in this case I would see the Produce category so I brought up the context menu for the list and tapped
Display as Items. Now I repeat the process for other categories. The result is a list that's conveniently sorted into categories that correspond to sections of the store. If you don't want to bother with that, just say the things you want to buy add them to the None category and you're ready to shop with a long alphabetical list of items.


 The first thing I did was import the grocery list that comes with the app. Even if you don't use many of the items in the list it has a bunch of obvious grocery store categories you can use to get started. The first screen shot is what the grocery list looks like after the import. All of the categories and items have been imported into the archive and the list is being displayed as categories.
 To add items, I tap the "Voice" button and start reading my list. When I'm quiet for a couple of seconds at the end, the voice recognizer kicks off a request to the cloud and after a tiny bit more aList shows the result of the voice recognition processing. This time the voice recognition worked perfectly. It's not that way every time. If you end up using the app, send me some of the funny voice recognition misunderstanding you get and I'll post them. When I process the list I get back from the voice recognizer, I present each individual word in the list. If you say "ice" "cream" those two words will be listed separately. I don't know if you want a bag of ice and a pint of cream or some Chunky Monkey. In this example, I said "sweet" "potatoes". So in order to add "sweet potatoes" to my list I need to check these two entires and tap the Combine button.
 If you get something weird from the voice recognizer and you don't want to correct it, just check the box and tap the Delete button or leave it uncheck when you tap Ok. If you get something close, but not quite what you want, tap the entry and an edit interface will pop up. Finally, check all the items you want to add to your list (in this case they're all good to go so I tap the All button) and click Ok. aList now asks me if I want to add this to the list without a category. I say no and go back and select Produce on the spinner.

 The help window explains how to add a new list either by selecting the green plus sign button or the microphone button along the top navigation bar of the app. Tapping the plus sign will bring up the obvious text based interface with all the necessary controls to enter a new list. The name of the list is the only required information. Everything can be added later in the "Edit List" interface. In this example I type "Day Job" for the name and assigned it a category of "Tasks". I'll also be adding a list called "Night Job" (you're looking at me doing that job right now). I will also assign it the "Tasks" category. Lists in the same category are grouped together in the active list and archive display.
 These two images show a little bit of the text entry process. By selecting the "New Category" on the spinner you can add a new category name as shown in the next image.
 Tap the microphone image button and you can say the name of the list you want to add and the category you want it to be in. For enter a list name, I arbitrarily process the voice recognition results into two groups. The first group is every word spoken expect the last word. The first group is the used as the name of the list. The last word spoken when adding a new list is used as the category. If you have a bunch of two word or three word categories, you'll have to fix things up by typing. (This is the first place I'll readily admit where the app could use some tweaks and improvements -- like making all the combinations of the words searching through the existing categories. However, entering the list name is not the most useful and fun part of the voice recognition in aList. Adding items is the best part of voice recognition and I'll explain that in a subsequent post). In this example I said "Night" "Job" "Tasks" and sure enough, that's what pops up on the edit interface and all I have to do is click OK.
 The third and final way to start a new list is to import one. The app includes ready-made lists you can import. You can import lists from the SD Card. A list on your SD Card can be one you create yourself in a text editor and add to your SD Card, one you get via email or download from a site or one you previously exported from the app. We'll get to all those things in due time. For now, let's pull in the example grocery list that is included with the app. (The movie list is fun to play with and it was a good list for testing since is has so many entries. I don't know how useful it will be in the end. Let me know what you think about it). To get the grocery list do the obvious (I hope). Bring up the options menu by tapping the menu button on your device. Tap the import menu item and tap the plus sign next to the Groceries entry. The list will not have any active entries. All of the entries start out in the Archive. Tap the green "Lists" button in the control bar at the top and switch to the Archive and start planning your shopping trip by selecting items to use them in the active list.